Pinterest
Showing posts with label Julep. Show all posts

Thursday, May 8, 2014

Review: Julep Ink Gel Eyeliner & Angled Liner Brush


Julep Ink gel eyeliner, Julep angled liner brush, review, @girlythingsby_e

Those Julep Eye Sheen liquid eye shadows weren't the only products Julep wanted me to test out. They also sent over their Ink gel eyeliner and angled liner brush too. In case you didn't know, I have a soft spot for winged eyeliner. I love a good waterproof, ink black eyeliner product. I'm surprised I haven't talked about this more since I'm essentially always rocking a wing. 

Well, now it's out there. And here's a confession, I love a good winged liner more than a smokey eye. I know. Shut the front door. But it's true. Even though I have lots of love for a smoked out eye (me-ow!), there's something about a winged liner that's just perfection to me. And it doesn't hurt that it helps give the eyes a little lift. 

With all that in mind, can we just take a moment of excitement over here? I was practically bouncing off the walls when this little number arrived in my mailbox. I'm always down to try out a new gel or liquid liner. 

Before we delve into how this testing session worked out for me, let's take a look at what Julep says about their product and what we should expect (taken directly from their site):
This creamy jet-black eyeliner is packed with encapsulated pigments that deliver intense lines with a silky-smooth, smudge-proof finish 
A Julep-exclusive blend of age-defying ingredients, Power Cell Complex™ provides rapid hydration without leaving an oily residue on skin. Discover our complete line of Power Cell Complex™ products. 
Key Ingredients:
Rosehip seed oil – delivers essential fatty acids to the skin, locking in moisture
Malvaceae Lipid Extract™ - provides immediate and long-lasting hydration
Green coffee bean oil – invigorates skin and promotes cell turnover
To use:
Create thick or thin lines with Angled Liner Brush. Cap tightly between uses.
Sound promising, right? Let's see how it stacks up.


Julep Ink gel eye liner, review, @girlythingsby_e

Packaging:

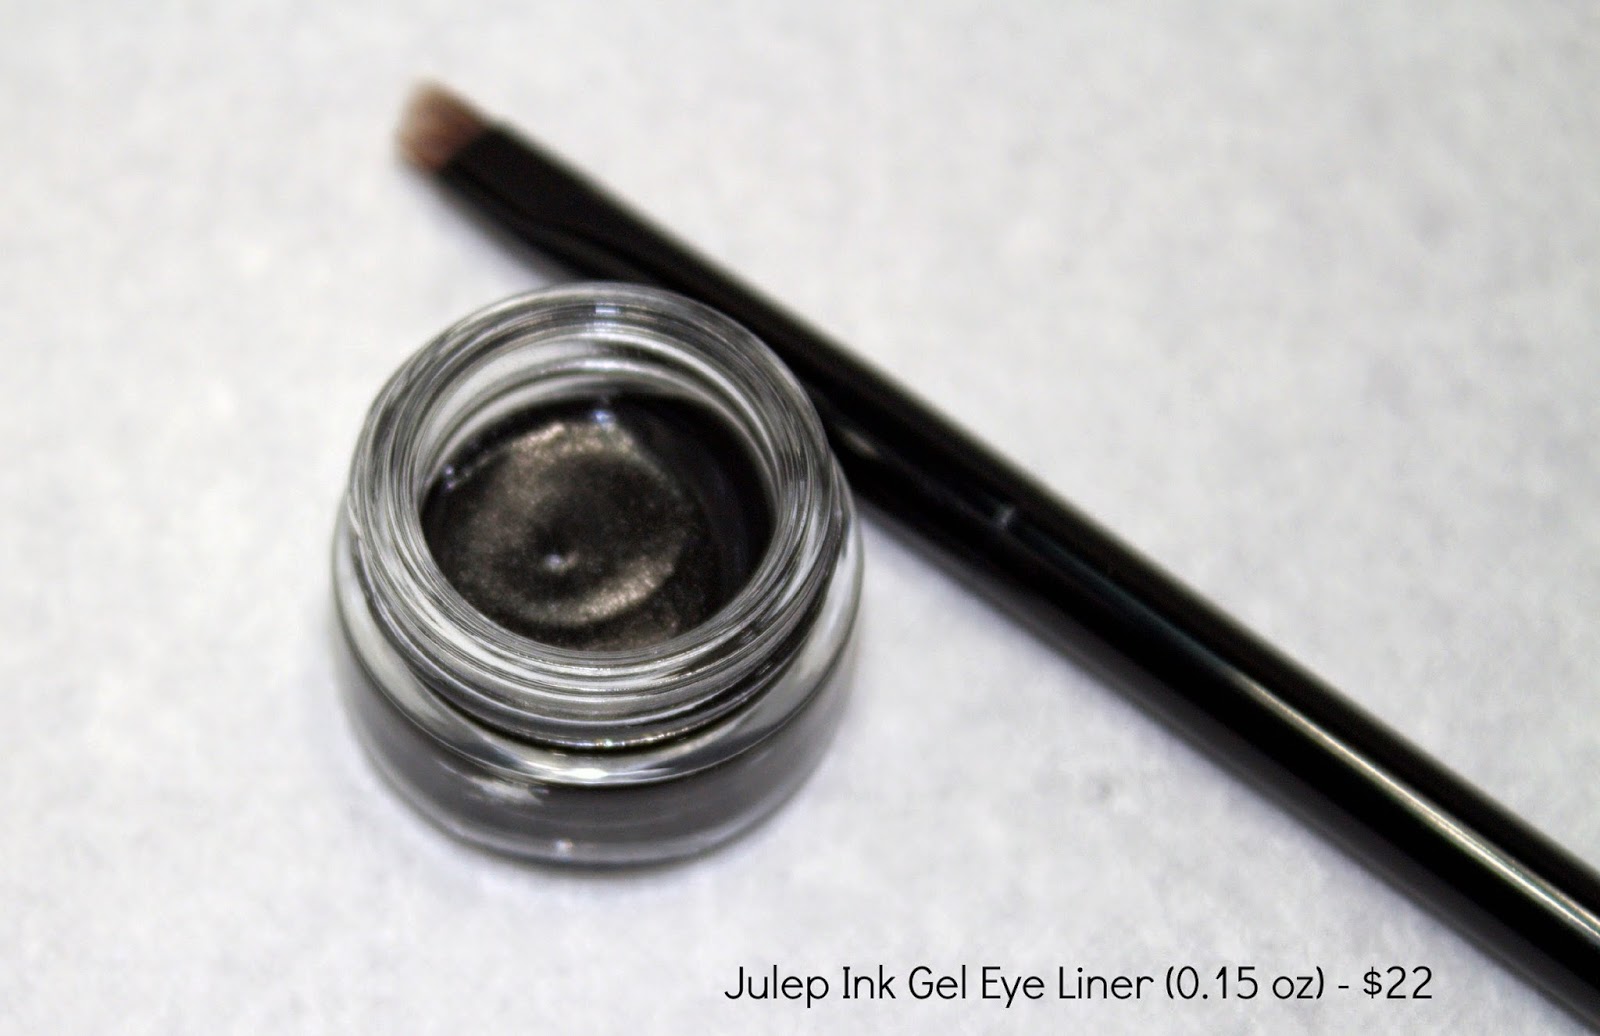
As I've come to expect with gel liners, this one is packaged in a little glass pot. It has 0.15 oz of product. The package seems pretty small, but the contents should last. The container is sturdy and the clear glass lets you see the product's color. 

Nothing earth shattering here, folks. This packaging works well for this type of product, so it's no surprise Julep used it. 

Performance and consistency:

Again, pretty standard (in a good way). The formula is creamy and smooth and feels smooth going on the lid. It's got a lot of pigment and delivers inky black lines. While it looks shiny when it goes on, it dries down to more of a matte finish. I'm happy to report the formula glides on pretty easily and the angled brush they provided allowed me to draw on thin and thick lines with ease.

Julep Ink gel eyeliner swatch, review, @girlythingsby_e


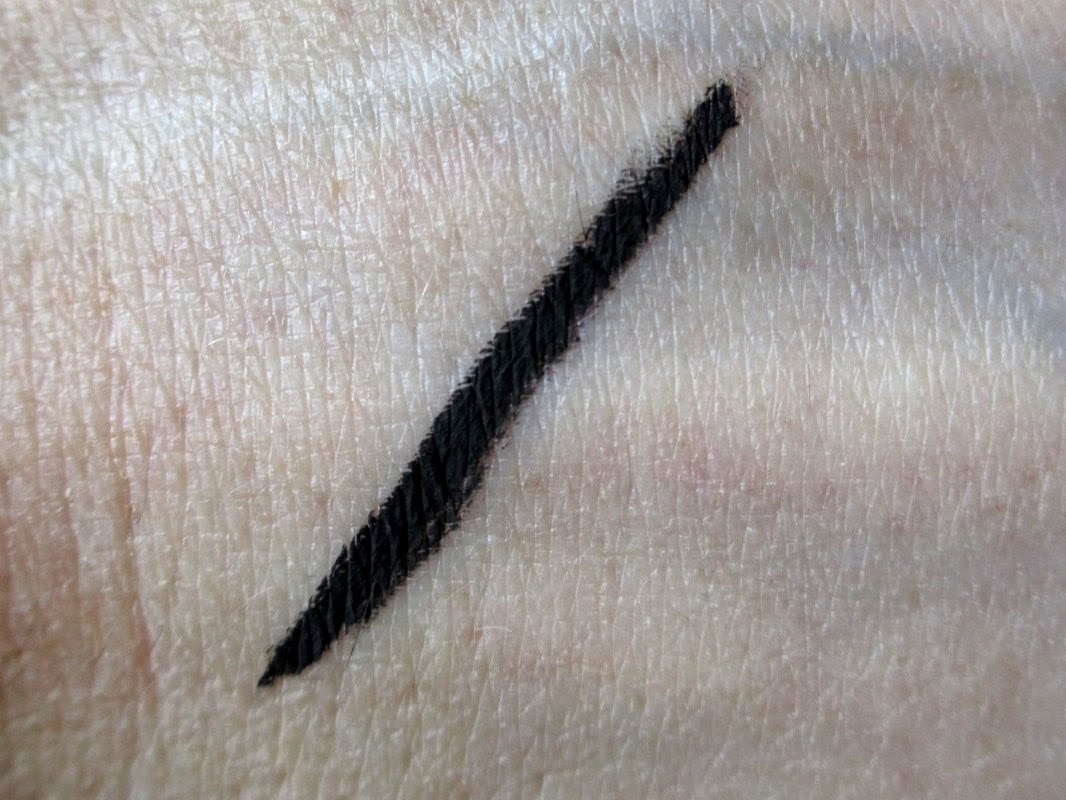
When swatched on the back of my hand, and allowed to dry, it stayed put, not matter how much I rubbed on it. Needless to say, this set my expectations high. 

Sadly, that kind of smudge-proof performance (a must-have in my book when it comes to gel liner) didn't translate when I wore it on my eyes. I experienced product transfer from my lash line to my eye lid as I wore it throughout the day, even when I waited for it to dry. I'd check out my makeup in the mirror to find a faint grey line along my crease - not exactly what I was shooting for. I also experienced smudging along the outer corner of my eyes. And when I wore it along my lower waterline, it traveled to my lash line - giving me an unintended smoked out look. 

It seems that as long as the gel liner doesn't come into contact with water, it stays in place. But once you introduce a bit of moisture, it smudges.I decided to test this theory. I swatched the liner on the back of my hand (again). Let it dry. And then tried smudging it with a dry finger (I wasn't gentle either). It stayed put. Then I dampened my finger and tried again. Smudge city. (Cue major sadness)

As you can imagine, this creates a problem. Eyes are naturally wet. When you add in sweat caused by heat and humidity and pollen-induced wateriness, it ups the anti. I need a gel liner that won't break down in the face of a bit of moisture (after all, I wasn't trying to wear it while standing in the shower). I can't say the smudging was terrible -- I didn't have crazy raccoon eyes. But it was noticeable, especially when trying for a clean look. Sad to report, this just didn't work out for me. 

About the angled brush:

Like the shader brush I recently tried out, Julep's angled liner brush retails for $18. It's bristles are soft, but stiff enough to do the job. It washes well (no shedding or shape loss) and I love the sleek shiny black design. I love that the bristles aren't thick, because it makes it possible to be precise and draw on a thin line. 

I think $18 is a bit pricey, especially since it's pretty easy to find angled brushes just about anywhere. But at least it's good quality. And if you're in the market for a mid- to higher- cost brush, I don't think you'll be disappointed. 

Plus, it's also cruelty free. 


Overall thoughts:

I think Julep has a little tweaking left to do on this formula. The the color and consistency are there. It's super dark and glides on easily. However, when it comes in contact with moisture (as it will around the eyes), it's not smudge-proof. Considering this retails for $22, I consider smudging a problem -- especially since other gel liners out there stay put. If we can fix that one thing, it will make a world of difference.

Once they have the smudging issue resolved, I'd love to see a few more colors. Perhaps a brown and a navy blue for when you want a softer line (or even for when you just want some variety). 

Disclosure of Material Connection: I received one or more of the products or services mentioned above for free in the hope that I would mention it on my blog. Regardless, I only recommend products or services I use personally and believe will be good for my readers. I am disclosing this in accordance with the Federal Trade Commission’s 16 CFR, Part 255: “Guides Concerning the Use of Endorsements and Testimonials in Advertising.”


Review: Julep Eye Sheen Liquid Eye Shadow & Shader Brush


Julep Eye Sheen, Julep Shader Brush, Review, @girlythingsby_e


Julep contacted me recently and invited me to check out some of their new products. Of course, I said yes. I mean, hi, I'm a little makeup obsessed. Perhaps you've noticed.

I was a bit nervous about testing out liquid eye shadows. My past experience with such products haven't proved fruitful. I've traditionally found liquid shadows to require more attention (and seeing as I'm lazy, I don't like high maintenance products). My general issues have been that they shift and crease and can be a bit difficult to blend (either setting too fast or too slow).

But since these are not the same shadows I've tried in the past, and it's been a long ass time since I've experimented with the liquid shadow, I pulled up my grown-up pants and gave myself a little pep talk. "It's makeup, not brain surgery. Get it together, E"

There you have it everyone, proof that I also get a little intimidated by makeup. I have to remind myself it's OK to make mistakes.

Anyway, back to the topic at hand. I received these early in April, which is actually pretty perfect considering the weather down here is getting to be particularly unbearable. It's hot. It's humid. It's rainy. It's sticky. And it's only gonna get worse. (Jealous?) What better place to test a product's stay-all-day claims than up against the likes of the power combo (heat and humidity) that melts everything? If it can survive here, my friends, well, you see where I'm going...

So let's get down to business. Who's takin' bets?


Julep Eye Sheen Nude, Julep Eye Sheen Fig, Review, @girlythingsyby_e

Before we get into how these worked, let's take a gander at what Julep has to say about them and what they should do (pulled directly from their site):

This gorgeous liquid eyeshadow glides on easily and sets to a satin finish that stays put all day. The buildable, blendable formula is enriched with our proprietary Power Cell ComplexTM.
Shades:
Dusty Taupe Shimmer
Warm Fig Shimmer
Pale Nude Shimmer
Deep Bronze Shimmer
A Julep-exclusive blend of age-defying ingredients, Power Cell Complex™ provides rapid hydration without leaving an oily residue on skin. Discover our complete line of Power Cell Complex™ products.
Key Ingredients:
Rosehip seed oil – delivers essential fatty acids to the skin, locking in moisture
Malvaceae Lipid Extract™ - provides immediate and long-lasting hydration
Green coffee bean oil – invigorates skin and promotes cell turnover
To use:
Sweep a thin layer over eyelid with fingers or brush. Let dry. Add more layers to intensify.

Packaging:

As you can see from the photo above, Julep's Eye Sheens come packaged in a potted container, which is pretty standard for most cream shadows. I was a bit surprised that these didn't come in a squeeze container (or even something more air tight), given their liquid-esque consistency. It would certainly make it easier to keep air out (so they don't dry out) and control how much product you use. 

I'm not dogging the packaging, though. It's sturdy and easy to store since it's small. The clear container gives you a good idea of the actual color and how much product you have left. You can also scoop out whatever product you need. I didn't experience any product dry out either. So far, they're in tip top shape. 

Consistency:

A few sentences ago, I called this product liquid-esque (did you catch that?). It's because it's not entirely liquid and it's not solid. These are definitely  thinner in consistency than a creme shadow, but they're not so watery that they'd drip out of the container if you held it upside down (demonstrated in the video below).

It's similar in consistency to lotion or even those gel-type lotions out there.

It feels light and slightly cool when applied to the skin.

Performance: 

Both colors I received were highly pigmented and dry down to a shiny satin finish. I only needed a tiny amount to get a nice wash of color. They blended out very easily using my fingers as well as the shader brush that Julep provided. I noticed that I was able to blend the color out better when I used my fingers, likely because the warmth of my hands helped keep the product from setting as quickly. 

Julep Eye Sheen Nude, Julep Eye Sheen Fig, Swatches, Review, @girlythingsby_e
Julep Eye Sheen Fig & Nude applied without primer underneath.

When applying, you'll want to use light layers to build up the intensity and allow each layer to dry completely before packing on the next one. Otherwise the layers beneath will shift around and the color won't build up as nicely. Additionally, packing on too much makes this product start to feel heavy on the lids and that feeling remains until you wash the shadow off. When you take a little more time to build up slowly, you can stop before it starts to feel heavy (and still get color pay off). 

When working with these, eye shadow primer is a must. Whenever I tried to wear them solo, I experienced a lot of creasing and fading. The higher the heat and humidity, the more noticeable the break down. When worn indoors in the air conditioning, these lasted all day long (with primer) and looked just as nice at the end of the day as they did when first applied. 

Sadly, they didn't fare as well outdoors. When spending time outside (resulting in sweating -- nearly inevitable down here), they creased and faded. While they'd still be on my lids by the end of the day, they showed definite wear and simply did not look good anymore. 

I'm curious to find out whether these fare better in cooler, dryer weather. Maybe they're just not meant for us Florida girls (at least, not outdoors). 

Cost and availability: 

Julep's Eye Sheen's retail for $18, contain 0.15 oz of product, are available in four neutral shades, and can be found on Julep's site. I wonder if these will someday hit stores? I haven't seen them at my local makeup shops. Have you?

About the shader brush:

Julep also sent over their shader brush ($18) for me to test out with their liquid shadows. They sure know the way to my heart. I do love a good makeup brush. I love the sleek glossy black handle and design. It fits comfortably in my hands and the bristles felt soft against my skin, but had enough give to help pack on color. 

While it's called a shader brush, this can also double as a concealer brush and maybe even a lip brush (it's larger than a traditional lip brush but workable).

After several washes, the brush retained it's shape, didn't shed, and the bristles felt as good as new. The brush quality is very good. 

If I had to nit pick at something, I'd say the price is a bit high. But I'm certainly nit picking here. It's about average cost for a mid- to higher-end brand. Like I said, splitting hairs. It really all depends on your personal budget and preference. For me, I'd like to see it cost less. Mostly because good shader brushes are pretty easy to come by in my opinion. 

If someone asked me about cruelty-free mid-priced brushes, I'd certainly suggest they look into Julep. 


Overall thoughts:

I loved how easy the Eye Sheen liquid shadows were to apply and blend, and that they offered great color pay off and a beautiful finish. For down here in Florida, these are just for indoor use. The heat and humidity seemed to be too potent for the budge-proof claim. I'd definitely wear these for days in the office and indoor dates with the hubs. But an outdoor beach wedding (lots of those down here!)? Not likely.

Bonus: Julep's products are cruelty free.

I'm genuinely curious to hear from anyone who had a different experience from mine. If you were able to get these to last all day in the heat, do you have any pointers?

Disclosure of Material Connection: I received one or more of the products or services mentioned above for free in the hope that I would mention it on my blog. Regardless, I only recommend products or services I use personally and believe will be good for my readers. I am disclosing this in accordance with the Federal Trade Commission’s 16 CFR, Part 255: “Guides Concerning the Use of Endorsements and Testimonials in Advertising.”

Monday, March 3, 2014

Manicure Monday: Green Ombre Nails

It's March! That means spring is almost here! And, since we're in Florida, it's pretty much here already. Thank goodness because I was ready to put a little spring on my tips.

To celebrate the impending arrival of warm weather and open-toe shoes, I decided on a green themed manicure. After all, it's appropriate for the season. But I couldn't just pick one green polish. Nope, I had to try my hand at an ombre manicure.

China Glaze Refreshmint, Julep Daphne, Revlon Posh nail polish, Ombre nails, @girlythingsby_e
OPI Nail Envy base coat, China Glaze Re-fresh-mint, Julep Daphne & Revlon Posh nail polish, Seche Vite top coat

I used the the makeup sponge method to achieve an ombre look. Here's a photo tutorial on the makeup sponge method so you can try it out for yourself.  

First, I laid down my base color, which was China Glaze Re-fresh-mint. Then, I applied Julep Daphne and Revlon Posh to a makeup sponge and stippled them on my nails. I definitely still need to practice to perfect the application. But it's definitely an easy way to try out this trend. 

A word to the wise, you'll be doing a lot of clean up with this method (you'll get nail polish on your fingers with the sponge). So learn from my mistake and place tape around the perimeter of your nail to help catch some of the polish. You'll still need to do some clean up, but the tape will reduce it by a lot. 

What kind of beauty trends are you introducing back into your routine to welcome (or maybe even speed along) spring's impending arrival? 


Friday, January 3, 2014

Glitter Gradient Nail Polish Tutorial


I know I've said before that I'm not a huge fan of full on glitter nail polish. Basically, I think I've outgrown the disco ball nail (unless it's for a very specific occasion, then maybe).

But here's the deal, from time to time, I like a little sparkle. And what's a gal to do when she's acquired a few glitter polishes? Not use them? Say it ain't so. No sir. This gal will find other ways to incorporate glitter into a look. And I'm partial to the glitter gradient, the glitter accent, and a glitter tip or moon.

I think that having a base color and strategically placed glitter helps give a sparkling manicure a little more sophistication. Don't you?

I may not necessarily wear it to the office (unless I worked in one where such things were encouraged, ahem, Zoya fairies), but I think this look is fun for the weekends or even special occasions (birthday sparkle, anyone?).

That being said, I recently stumbled on a pretty nail polish photo one Pinterest (where else, I mean, really?) and posted it on my Facebook page. It' seems a few of you liked it as well. So I decided to share a video tutorial on how you can achieve the same look.

Here's the photo that inspired my manicure:

Photo credit: Nemos Nails
NOTE: I already used the technique that Nemo's Nails demonstrates on her blog for doing a glitter gradient before I read her blog. However, it wasn't until I saw this photo that I thought to mix glitter polishes together to create more dimension. I've seen the light!

Check out the very easy technique that you can replicate for yourself at home:


Here's an extra photos of my finished glitter gradient nails so you can have a better look:

Glitter Gradient Nails, @girlythingsby_e

A few tips:


  • I find using a neutral color (nude, pink, black, navy blue, white, grey) as a base works best, that way it won't clash with the glitter. But of course, you choose whatever colors suit your fancy.
  • I like the technique of using multiple glitter polishes because it build dimension, however, you can easily just follow the same steps using one glitter color. 
  • The same technique would work well with the same glitter color and different glitter sizes (e.g. micro glitter mixed with chunky glitter) and also give dimension.
  • Make sure to wait between each coat to avoid too much glitter travel.
  • This manicure is easy, but takes a little time so make sure you're not in a hurry because it takes a little extra time to dry and set all the way. 
How do you feel about glittery tips? Would you try this at home? Isn't it so much easier than you imagined? 


Thursday, July 4, 2013

Holiday Manicure: Patriotic Nails

Happy Fourth of July! I hope everyone is having fun and being safe. Here's a little peek at how I decided to show my celebratory mood.

OPI Nail Envy base coat, Zoya Carmen (red), Zoya Ibiza (blue), Julep Kate (white), Julep America (glitter)

Friday, May 10, 2013

Review: Julep Sugar Smooch Lip Scrub


I recently received Julep's Sugar Smooch lip scrub when I got my Julep Maven May subscription box. If you read my post on this month's box, you know that I paid and extra $9.99 to add it on to my box since it wasn't included in the one that I chose. 

The lip scrub retails for $14, but if you're a Julep Maven you can purchase it online for $11.20. I ordered it because I was curious to see how well it worked. But mostly, because I thought the packaging was adorable.  

I've gotta tell you, I'm totally floored by how this product works and more importantly how it feels on my lips. To give you a point of reference, I've been using Lush's Mint Julips as my lip scrub and I loved it. Julep's Sugar Smooch lip scrub totally blew Lush out of the water. 

Both scrubs have ingredients to moisturize your lips while they exfoliate. However, Julep's version seems to be more effective. The consistency is much moister than Lush, almost like a sugar paste. And when you apply it on your lips, it feels more soothing and gentle. It really does feel like butter, probably because it has shea butter in it. But the most impressive part is the soft moisturizing feeling it leaves behind when you rinse it off.  The best description I can muster is that my lips felt like I had just applied lip balm or lip butter. Completely amazing. And it smells like caramel. Absolutely delicious. 

Here's how Julep describes it:

This scrumptious blend of brown sugar, molasses, conditioning oils, vitamin E, and shea butter will leave your lips soft, smooth, and ready for color (and kisses). 
I'd say it's pretty spot on! 

Check out my video review for extra information:


Do you think you'd give Sugar Smooch lip scrub a try? Have you already? If so, how do you like it? 

Monday, May 6, 2013

Manicure Monday: Julep Maven May


It's Julep Maven time again! For the month of May, Julep's Maven* subscription boxes were all inspired by The Great Gatsby and the beauty and colors that were popular in the 1920s. I purchased the Boho Glam box this month, which included two nail polishes (Alice & Millie) and three travel-sized lipsticks. I also chose an add on for this month, the Sugar Smooch lip scrub -- which was part of the beauty maven box. 

I received Boho Glam box on May 1. However, when you choose to add on products to your box, those get shipped separately. I received my lip scrub on May 4. Julep Maven subscription boxes are $19.99**, add ons vary in price. The lip scrub add on cost me $9.99. 


Sinful Colors base coat, two coats of Julep Alice, no top coat
 Alice is a beautiful pale lavender with a shimmer finish that gives it a nearly pearl-like finish. This color is feminine and soft and definitely reminiscent of the soft, pastel, feminine colors of the 1920s. One coat results in a sheer finish, while two coats give you the color pay off in the bottle. The formula isn't overly thich, which makes it easy to work with.

Sinful Colors base coat, two coats Julep Millie, no top coat
Millie is a gorgeous indigo blue that has just a hint of purple undertone, which you can see better in person. It reminds me a bit of Sinful Colors Rain Storm and Zoya Natty, except in person it's just the slightest bit more grey-purple. Both Rain Storm and Natty are really similar to Millie and both have more product for a more affordable price (Rain Storm is $1.99, Natty is $8, Julep polishes usually run $14 when purchased at retail stores). 

Millie gives you color pay off in one coat, but two coats looks much better. It's a bit of a thicker polish than Millie so it can be just the slightest bit more difficult to work with (but only slightly). 

Sinful Colors base coat, two coats Julep Alice, one coat Julep Millie, China Glaze Fast Forward top coat
Millie and Alice compliment each other well. So, if you plan on doing some nail art, like I did, this color combo will look fantastic. 


I also received three mini lipsticks in this month's box that I was particularly excited about. The packaging is really cute, with the decorations on the box having a vintage feel to them. I also love the gold packaging for the lipsticks. Again, it gives off a vintage vibe and just looks so pretty and dainty.

Left to right: Tea for two (nude sheer), Lady in Red (matte), Satin Doll (poppy sheer)


Lady in Red is by far my favorite lipstick in this little trio. For starters, it's the only real lipstick, since the other two are sheer colors that are almost like a tinted balm. Lady in Red is a beautiful true red, which will suit all skin tones, and has blue undertones that will make your teeth look super white. It glides on smoothly and feels moisturizing on the lips. It's described as a matte shade, but I see a bit of shine to it that makes me think it's more of a satin finish. That works for me, I love a pretty satin finish. 


Satin doll is a pretty sheer poppy red that is so sheer it gives your lips (well, at least my lips) barely there coral tint. Like Lady in Red, this glides on smoothly and feels super moisturizing and creamy on the lips. But it's so sheer, you can barely tell you have anything on. Personally, I would've preferred a little more color pay off. In fact, I have tinted balms that offer more color pigmentation that this does.


 Tea for Two is described as a sheer nude. Applied, it's so sheer, it's basically translucent. You may as well just apply a little lip balm to your pout. You'll get the same result. I'm not really a fan. Like the other two lipsticks, it's incredibly creamy and feels great on your lips. But if there's no color to be had, I simply do not see the point. I prefer my lip colors to pack a little more punch.


The lip scrub is absolutely adorable in it's gold sphere package that reminds me a bit of the eos balms, except fancier. The scrub smells AH-MA-ZING, like brown sugar and caramel. It's made from brown sugar, molasses, conditioning oils, vitamin E, and shea butter, which will help keep your lips soft and kissably smooth. 

All in all, I'm glad I didn't opt for the beauty box this month. I wasn't all that interested in the mascara and would've been disappointed to only really like one or two of the products received (Lady in Red and the lip scrub). I'm sad to say, I'm left underwhelmed. 

Check out my video "unboxing" to see some of the other goodies that came in the box:


Do you subscribe to the Julep Maven program? Which box did you get this month? How did you feel about the beauty products? 


* This is my personal Julep Maven link. Using this link to join the program helps me earn Julep points, which I can eventually redeem for free subscription boxes or add-on items. These personal referral links are available to everyone who joins the Julep Maven program. 

** I redeemed my Julep Maven points in May, which means I received my subscription box for free (normally $19.99). I paid separately for the lip scrub add-on.  

Video music by Dan-O at danosongs.com 


Monday, February 18, 2013

Manicure Monday: Marion


Welcome to Monday, again! Today I'm rocking the last polish in my Julep Maven February box: Marion. Isn't she pretty? I just love teal polishes. Such a pretty color. Marion is a teal creme with silver micro glitter. The only thing is, the glitter is so subtle, it basically just looks like a teal creme, which I already have in my collection. If you look closely and squint you can see it on my nails, or you can just look at the top of the bottle and see it there.

The glitter becomes more prominent when you go to remove the polish because like most glitter it's more difficult to remove from your nails than regular polish.

Regardless, I love this color because I have such a love for the shade. So, it's not bothering me that it's turned out to be an almost-repeat shade.

I decided to give it a little bit of flair by adding an accent nail. I used OCC polish in Suspiria to add polka dots and hearts. Don't worry, I'll be featuring Suspiria in a future Manicure Monday post. It's much brighter than it looks layered over Marion.

Incidentally, pardon my dry hands in this pic. It was a bit chilly this weekend down here and the chill took its toll on my skin.

So what do you think of Marion? Is she worth acquiring or do you have something similar in your nail arsenal already?

Monday, February 11, 2013

Manicure Monday: Joan


Welcome to another week everyone. We can thank my forgetfulness for this weeks' manicure. Had I not completely forgotten to sign in Julep last month to skip the month (as I had planned since I have so much nail polish already and need a little break), I wouldn't have ended up with Joan, a pretty raspberry polish with loads of gold micro glitter. I thought it an appropriate manicure choice considering it's Valentines Day week and it's a bit of a different take on the typical red or pink Valentine's inspired manis. 

Joan performs like most Julep polishes. It goes on smoothly, isn't overly thick, and looks nice an opaque after two coats. It's pretty and probably something I wouldn't have picked out for myself on my own. I think Joan's color shade makes her a bit of a sophisticated siren, while all the glitter still makes her playful. 

What do you think of Joan? Is she a polish you'd consider for your collection? 

Monday, February 4, 2013

Manicure Monday: Rebel


If you watched my video last week, then you saw that I got my February Julep Maven box in the mail and that I was quite happy with the colors I received, especially considering the colors were a surprise. 

After I posted the video, a few people were kind enough to let me know that the silver polish I received was in fact different from other silvers I might have in my collection. Rebel, is a holographic polish, which means it has a lot of shimmer in it and a bit of an iridescent sheen. So, naturally, I had to give it a try first to see how it would turn out. I have to say, I'm pleased. 

It is most certainly much more shimmery than my other silvers. However, I have to say, I don't quite get the holographic effect as much unless I'm indoors under artificial lights. I tried taking photos of this in natural sunlight and it simply wasn't showing up. It looked like any other silver polish you might find anywhere else from any other brand. But, up close and under a bit more scrutiny, you can certainly see the difference. That's why the photo I'm sharing was taken indoors under daylight bulbs. Even then, I wasn't able to capture the iridescence as well, but you can see that it has quite a lot of shimmer in it. 

This goes on really nicely, it dries down to almost a matte silver with lots and lots of shimmer. Once you add a shiny top coat you can see the holographic effect a lot better. One coat covers well and gives you good color pay off, but two coats gives you more shimmer. And really, if you're getting a color like this, you want the shimmer. 

All in all, I think it's a really pretty color, which means I'll be keeping it in my personal stash. 

Did you choose this Julep Maven box this month? What did you think of Rebel? Did it live up to your expectations? 

Wednesday, January 30, 2013

February Julep Maven


It's that time! I received my February Julep Maven subscription and to my surprise (I'd forgotten to log in and choose which box I wanted), I received the American Beauty collection. I love it!

UPDATE: I've been informed this could possibly be the It Girl box. All of my polishes are labeled American Beauty, but it can be a misprint. Others have said they got the same polishes in the It Girl box.

The box contained the following items:

  • Three nail polishes: Rebel (silver), Marion (teal with silver shimmer),  and Joan (raspberry plum with gold shimmer)
  • A Freedom Polymer Top Coat (gives you a gel finish without the hassle of gel manicures and much easier to remove) 
  • An eye lash curler
  • Chocolate
Check out my video to see all the goodies for yourself!


A Julep Maven subscription is $19.99/month. You can sign up here. Read more about the subscription service here.

______________________________________________________________________

None of the products in this video were given to me for the purpose of review or promotion. I purchased the products myself. 

Video editing software & music: iMovie
Music by Dan-O at danosongs.com


Monday, December 24, 2012

Manicure Monday: Carmen & Jordan


Happy holidays everyone! Thought I'd give you a little gander at my holiday manicure. Gotta represent the Christmas spirit with some bright red nails, and I thought no other color would suit me better today than Zoya Carmen because she's fiery. Best way to describe her: she's a creme finish in a fire engine red. Bright like a sports car and absolutely gorgeous. To give her some pizazz, I decided to pair her up with Jordan, who I think brings some fun sparkle into the mix.

The color pay off you're seeing in each is a result of two coats. They both definitely need it. Carmen it hot, but she's makes me think of a jelly formula. A little sheer with one coat, but great once you build her up. Same with Jordan, but that's expected with most glitters. Two coats give you the coverage you see in the bottle.

What do you think? I'm toying with a full on Jordan manicure for New Years. Gasp! You read that right, I may just go full on glitter. I like Jordan that much.

Hope everyone has a wonderful Christmas eve and day!


Tuesday, December 18, 2012

Belated Manicure: Julia


Apologies for being M.I.A. with the Manicure Monday post yesterday. I had a bit of a manicure mishap. I got my nails done on Saturday, and by Sunday night, they were completely ruined. I mean chipped like a five-day manicure. Three out of five nails were missing half their polish. I'm giving Julep the benefit of the doubt. I can usually get a manicure to last three days or so before any minor chips. The destruction on my nails yesterday was atrocious. I think it's because the manicurist didn't use a real base coat. 

Regardless, I wanted the chance to redo my nails because I thought this polish was pretty enough to share with you fresh (not a botched attempt to fix the shoddy manicure). So, without further ado, I give you Julep Julia. 


I picked this one out as an add on to my December Maven box, and I received it a few days after my Maven box arrived. I really like this color. It seems rather unique. It's a beautiful lavender-grape with a duo-chrome gold shimmer. Such a pretty combination. I love how this isn't a purple shimmer that simply enhances the base color. Instead, it's a lovely complementary shade that makes the polish literally sparkle. 

The first coat goes on a little sheer and mildly streaky, but once you top it with a second coat it all evens out and looks fantastic. Now I just have to see if the sub par lasting power was a fluke and indicative of a crappy manicure job or if this polish is more prone to chipping. I really think it's the former though. 

What do you think of this shimmery color? I think it would be quite appropriate if anyone plans to attend Mardi Gras this year (or anytime really) - perhaps with a cute green accent nail. 

UPDATE: I was right. Julia lasted much longer once I did the manicure myself. I got a good four days of wear before any big noticeable chips. That's a huge difference from my less-than-48-hour manicure experience. Another indication that I got a shoddy job: My pedicure chipped in three days. I never have a pedicure chip that fast. I usually have to change the polish before it chips because it's been on for too long and if I don't it will start to look overgrown. So, fear not, you won't get this polish and experience less than stellar wear. 

Monday, December 3, 2012

Manicure Monday: Julep Maven December - Petra & Jordan


Received my Julep Maven December subscription this weekend. On December 1, to be exact. I usually don't get mine until around the forth of the month, so I was quite surprised. This month, I chose the Boho Glam box, which is actually the profile I got when I took the little quiz at the beginning of the subscription so they could match me up with the polishes that best fit my style. Truth be told, I usually like the colors in the Boho Glam boxes. But I usually have something relatively similar already. I guess they chose my profile correctly indeed.

I chose Boho Glam this month because I totally loved Petra. It's a beautiful shimmery berry hue. It's absolutely stunning. The photo above picks up the color well, but for some reason isn't picking up the shimmer as well. Perhaps it's because they pale in comparison to the glitter polish I paired with Petra. Regardless, it's totally gorgeous. Two coats (which is what is pictured) takes a deeper berry finish, inching it just slightly toward a red-magenta. One coat, keeps it a little more on the magenta side. And although it's not fully opaque, one coat provides some pretty impressive coverage. The formula applied easily and smoothly and in my opinion looks phenomenal.

Since it's the holiday season, each box this month featured some sparkle. I know I've been vocal about how much I'm simply not into glitter polish. But I think Jordan might just change my mind. I can still say, I'm not keen on multi-colored glitter polish. But I'm really digging this gunmetal silver micro and chunky glitter polish.

Knowing I'm not usually crazy about a full-on glitter mani, I decided to pair the two together, stamping the ends of my nails with Jordan. I wouldn't call it a french mani per say because it's not a neat line, and it's not quite ombre either since it doesn't fade softly. Perhaps it's more of a hybrid between the two. I really like the look. It's fun and festive.

If you would like to see how I did the manicure, comment below. I'm thinking it could make a fun video tutorial.

What do you think of Jordan and Petra?


Monday, November 12, 2012

Manicure Monday: Thunderbird - Amplified


I was perusing Pinterest the other day an came across this cool post that showed someone layering nail polish over glitter nail polish, giving the nail polish a glitter finish, but also making the glitter look as though its part of the nail polish (as opposed to added on top). 

I decided to give it a try with China Glaze Thunderbird - a shimmery deep red - layered over Julep Mila. I'm not a big glitter polish girl, as I've stated before. But I thought this technique would be better for me as a way to amp up my polish without it screaming glitter. For some reason, I always feel like glitter top coats always look better on everyone else. 


The first time I tired this trick (on Friday), it worked beautifully. I did it at night, so I didn't take a photo. Boy do I wish I had that photo. I got the layering perfectly, and Thunderbird looked like a pair of ruby slippers. Alas, I started working on a little DIY project at home, and totally destroyed my manicure. 

This time around, Thunderbird is still more sparkly than it is on its own, but not quite as sparkly as my first attempt. I'm totally kicking myself. But I still like how it turned out. As you can see from the bottle, Thunderbird has some shimmer, but it's not super glittery. By adding a layer of Mila between coats of Thunderbird, I gave the polish a bit more pizzazz.

Here's a closer look:


 In the right light, the glitter shines through. You can see it best on my pinkie finger in this shot. So, I'm excited because I have at least two glitter polishes that I've found a new way to use so they don't just sit there going to waste. 

Next time, I'll apply a lighter top layer so the glitter shows up even better. That's where I think I went wrong. I was a little too heavy handed. Another thing I learned is that this trick doesn't work with all polishes. You want to make sure you use a polish that isn't super opaque. For example, use a polish that definitely needs two coats to get the color pay off you want. Otherwise, if the polish is super pigmented it will just cover up the glitter and all you'll see if a lumpy top coat. Not pretty. I tried it with Zoya Kelly and that's the result I got. 

Alright so here's how you do it:
  1. Apply base coat
  2. Apply one coat of your choice of nail polish color (Thunderbird for me in this case)
  3. Apply a coat of glitter polish (any glitter polish will do)
  4. Apply a thin layer of the color nail polish on top of the glitter
  5. Apply top coat
  6. Let dry and sparkle on!
I think this is a great trick to spice up your color selection using polishes you already have. Heck, I'd forgotten I even owned Thunderbird until I dug in the back of my nail polish drawer! (Side note: I really need to get on top of making my own nail polish rack)

Well, what do you think? What polishes will you be sprucing up this holiday season? 


Monday, November 5, 2012

Manicure Monday: Trina & Donna


Well, it's been a few months since I got a new Julep Maven* box. I skipped September and October because I just wasn't crazy about the colors and I was going to be out traveling so I didn't have the budget and I wasn't going to be in town to receive the October box anyway.

Plus, I'd bought a few new polishes from Zoya and Sinful Colors, so I figured I needed to slow it down on the nail polish acquisition.

But, this month, Julep caught my attention again with the color selection picked out for their Bombshell profile. Usually, I get the It Girl profile because it has three polishes instead of two. But I liked the colors in Bombshell this month better.

The colors: Trina (a gorgeous purple amethyst/grape color with purple shimmer) and Donna (a beautiful peacock teal blue creme).

Both colors applied really well. They were opaque and I could have easily gotten away with one coat (but I still did two). And they weren't streaky at all.

Check out my video (above) to see the rest of the items that came in the November box and the polish swatches below.


Julep Maven* is a nail polish subscription service. It costs $19.99 per month. You can opt to skip months whenever you want. Check out my posts to see swatches from previous months and learn more about the service.

Get your first month for half off with code MAVEN50.

* This is my personal Julep Maven link. If you join using my link I earn credits that can be redeemed for free nail polish. This is not an offer exclusive to me. Everyone who joins the Julep Maven program receives their own personal link to share and can also earn credits toward free polish.


Monday, August 27, 2012

Manicure Monday: Stefani


Last week I showed you a gorgeous rose gold polish from Julep, which I received in my August Julep Maven* subscription. I changed things up this month, opting for the American Beauty box over the It Girl polishes specifically for Dakota, but also, because when I go for metallic polish, it's usually a gunmetal hue. The American Beauty box delivered.

Stefani, the lovely gunmetal polish pictured below, take a bit of a different twist on the shade by including flecks of gold shimmer. It's actually quite subtle, so it didn't pick up that well in the photo, but if you look at the bottle, you can see just the slightest hint of gold sheen in the polish. The gold picks up a bit better in the sun, however, it's still very subtle. I like it, because it's unexpected. I normally expect silver shimmer with gunmetal, so I was happy with this little twist. 


As with Dakota, one coat gives you a good color pay off, but the photo above is a two coat shot. Turns out, my base coat was partially to blame with the slow drying time I was experiencing with the rose gold polish last week. However, even with a new base coat, this color also took just a hint longer to dry than I'm used to. Does anyone else experience that? Perhaps it has something to do with the metallic colors. On the plus side, the dry time was no where near as ridiculous as last week, where upwards of 20 minutes later I was still messing up my manicure, which should have been long dry by then. 

This one just took an extra minute or so than I'm used to, nothing earth shattering. Especially since I love a pretty gunmetal polish so much. It always makes me feel kind of like a rock star. And with the gold-flecked twist, Stefani makes me feel just a bit more edgy. All I need now are my motorcycle boots, black skinnies, and a rockin' smokey eye. 

On another note, I'm trying a new nail polish experiment. I read a trick over at This That Beauty. One of the contributors stumbled upon a trick that made her regular manicure last nearly 10 days without chipping on natural nails. That's right, no gel mani. She used regular polish on her real nails. You can read about here experience here. Here's the Cliff's Notes:

  1. Paint your nails normally: base coat, two coats of polish, top coat.
  2. Wait for that to dry.
  3. Apply one more coat of polish over your finished manicure. (This step and the next can be done the next day if you prefer, but do it before you experience any chipping.)
  4. Then top that with another layer of top coat and let dry.
According to Christine, her manicure stayed pristine for 10 days and may have lasted longer but she had to change her polish color to something more conservative for a work meeting. She has since tried it several times and found her manicures last a lot longer.

I'm thinking it worth a shot, so I decided that I would experiment with this week's color. After I took the photo above, I added one more coat of polish and top coat. I'll let you know how it works. If it's in fact successful, next week's Manicure Monday may just be Stefani again. Stay tuned!

* This is my personal Julep Maven link. If you join using my link I earn credits that can be redeemed for free nail polish. This is not an offer exclusive to me. Everyone who joins the Julep Maven program receives their own personal link to share and can also earn credits toward free polish. Get your first month for just $0.01 with code COLOR2012 or get two free polishes with code 2COLORS.


Monday, August 20, 2012

Manicure Monday: Dakota


Rose gold is all the rage.And can you blame anyone for loving such a beautiful metal? It compliments pretty much every skin tone, and it's just a different enough from the yellow and white varieties you see every day, that it draws your eyes to it. But, if you can't really afford to go buy new jewelry, why not rock the beautifule hue on your nails? Metallic polish is in for fall. Why not combine the two trends. Check out Julep's Dakota, their take on rose gold metallic polish.


 This polish goes on beautifully and the color is more of a feminine take on the metallic trend. I usually see metallics in rock n' roll colors like gunmetal and silver (maybe its because those are the ones I gravitate towards), and this was a nice change of pace. A little boho, a lot feminine, and still a bit edgy.

I'm gonna tell you all a little secret. That picture is one coat (gasp!). Yes, you read that right. One coat. That's all it needed and I stopped at that. But there's a compelling reason for that. Because if you read this blog regularly, you know that even if  one coat is enough, I still go for two. 

Here's the catch: this polish takes forever to dry. Even with a fast-drying top coat (I tried both Sache Vite and Fast Forward), the polish didn't dry and set quickly. I went trough a quarter of the polish bottle redoing my nails (last week and this week) because I would keep getting dings and dents from the top coat drying and the bottom coats staying damp. In fact, last night, I did my nails three times -- apparently not learning my lesson from the multiple attempts the week before. I was trying to do some cool nail art with tape, and would wait a good 15 minutes before trying to tape my nails to add a coat in a different color.. And inevitably, I'd destroy the manicure. Fifteen minutes! How long do I have to wait?!

Eventually I gave up, and decided to just show you this color on its own. I once again removed all the polish and redid my nails. About an hour later, I went to fix the sheets on my bed and my polish shifted. The top coat dry, but not the bottom coats. Luckily, it wasn't drastic and I was able to salvage it, mostly. 

I'm actually rather surprised by it and rather sad that I've wasted so much polish redoing manicures. It's such a beautiful color! I'm going to buy a new base coat in hopes that perhaps it isn't the polish and maybe it's my base coat that just needs replacing (it is nearing the end of the bottle). If that fixes the problem, I'll update this post. 

Update: My base coat seemed to be partially to blame for my extended dry time experience. Replacing my base coast significantly cut down the dry time, although I still found the polish dried a bit slower than other polishes. However, I can apply two coats without a problem now and just have to wait about a minute longer for the polish to dry. 

Has anyone had a similar experience? The same was happening with another metallic polish I got in my Julep Maven August subscription. I'm wondering if its the metallic polish or something else.

Monday, July 30, 2012

Manicure Monday: Mila


My nails are feeling a little festive. At least my ring fingers are. I received two glitter nail polishes in July's Julep Maven box, and Mila is one of them. I've gotta be honest. I wasn't overly excited about the glitter polishes. Glitter on my nails just really isn't my thing. I loved it when I was a teenager, but I feel like I've simply out grown it. So, I kept thinking, how am I going to wear this? Should I just gift it to someone in my life who still likes to wear glitter polish? But more importantly, how am I going to showcase it not he blog? 

You see, I don't typically just paint my nails and wipe it off just for the benefit of a swatch. I typically show you my manicure. One that I have actually worn. As in out. In public. Likely for several days. I just can't bring myself I rock an all glitter mani anymore. Not unless its for a specific special occasion, like maybe a New Years Eve function. 

I just tend to find glitter polish difficult to work with and and wearing it makes me feel like I'm trying too hard to relive high school. Glitter polish just isn't my cup of tea. I'm more partial to a boldly colored polish. Creme, shimmer, and even metallic, I'm ok with. It's glitter I try to avoid. 

So I finally settled on trying the glitter as an accent nail for two reasons: 1) I wanted you all to see the how the glitter polish performed all on its own, and 2) I figured an accent nail in glitter would be less in-your-face (I know, I know, this is coming from a gal that will wear a neon color. I can't really explain it away with logic). 

I gotta say, at first, I was a bit unenthused. But as the day went by, it kind of grew on me. Mila is a multi-color micro glitter polish. Julep recommends it be worn over Kate. I may try that on an accent nail the next time I wear Kate. They also recommend using Mila as the tips on a French mani, over Daphne. Looks good in the pic, but I still haven't mastered doing a French on myself. 

I paired Mila with a pretty lavender, Essie's Oh So Nice. The reds and green in Mila kind of clashed with Oh So Nice. But  I can't really fault Mila for my faulty pairing. Otherwise, the longer I looked at it, the more it grew on me, though I think I'd still stick to glitter for special occasions that call for it. 

If you like glitter polish, you may like Mila quite a bit. The micro glitter was much easier to work with than a chunky glitter polish, and two coats (though a bit heavy handed) saturated my nail with glitter pretty well. And, since I applied it slowly, knowing how messy glitter can get, I managed not to get it everywhere. 

What do you think of Mila? Are you a glitter polish girl? 

Monday, July 23, 2012

Manicure Monday: Kate


Ah, yes. Another swatch from my Julep Maven* subscription. I did warn you I got four polishes in the July box. I was super stoked about Daphne, since I love sea foam green polish. But I can't say I wasn't excited for Kate. Ever since I got Essie Marshmallow for my wedding, I've been a bit in love with white nail polish. 

Kate is more of a bright white creme. For the sake of comparison, Essie is more of a soft white. It's not opaque. You definitely need to build it up. Kate on the other hand, is an opaque white. It's definitely a starker color, like a new white t-shirt or a pair of socks in a Clorox commercial. It's basically the color I was trying to avoid for my nuptials since I wanted something more subdued. But I love it as an everyday attention-grabbing polish. You may think, it's just plain ol' white, but it's certainly not a boring color to wear on your hands. And I gotta say, it definitely doesn't look like I painted my nails using white out. 

What do you think? Are you partial to white polishes? 

*This is my personal link for Julep Maven sign up. When you use this link I get a credit in my Julep account. This is not something that is reserved special for me. Everyone who joins Julep Maven gets their own personal link they can share with others and when people sign up using your link, you can earn credits too. That is, if you decide to join.